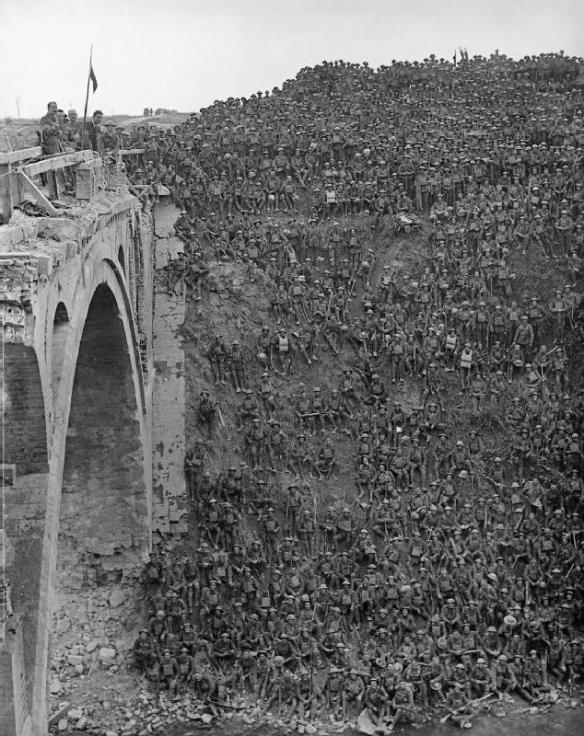
Brigadier General J V Campbell addressing troops of the 137th Brigade (46th Division) from the Riqueval Bridge over the St Quentin Canal.
The attempt to break the Hindenburg Line at Bony and Bellicourt had been slow and costly, but it was not the only attack in progress on 29 September. Formidable though the obstacle might be, extensive plans had been made to master the St Quentin Canal. This task fell to the Territorials of 46th (North Midland) Division.
The Royal Engineers devised a series of gadgets. Mud mats of canvas and reeds were to provide footing over the miry shallows, ladders would be available to scale the steep canal banks and collapsible boats would ferry troops across. The cross-Channel steamers were plundered of their life-belts. Experiment showed that a fully-armed man could rely on a life-belt to keep him afloat and that the boats could be unfolded and on the water in twenty seconds. This was not only prudent and practical but also excellent for morale.
As the Americans launched themselves against the line to the north, the 1st/6th South Staffordshire Regiment advanced behind a creeping barrage from the positions secured by the division’s 138 Brigade two days earlier. In the fog, and organised into small groups, they worked their way up to the enemy positions then rushed in with the bayonet. The west bank was soon in their hands and they waded across to overwhelm the allegedly impregnable positions opposite. By 8.30am Bellenglise was in their hands. On their left the 1st/5th South Staffords made use of the boats to cross the waterway, also exploiting the advantage of the poor visibility.
Close to the southern end of the tunnel the Riqueval bridge strides over the canal opposite the junction with the Le Cateau road to give the local farmers access to the fields on the western bank. The Germans had, of course, prepared charges so that it could be blown up in case of attack.
In the fog of the morning of 29 September, Captain A.H. Charlton had to navigate by compass to find the bridge at all. As his company of the 1st/6th North Staffords emerged from the mist they came under fire from a machine-gun sited in a trench on the western side. A bayonet charge put an end to that. Alerted by the firing, the demolition party of four men appeared from the German bunker beyond the bridge and ran to blow the charges fixed to the structure. Charlton and his men beat them to it, killing all four and cutting the wires to the explosives. The rest of the company dashed over the bridge and cleared the trenches and bunkers to secure passage for the brigade.
The supporting troops moved up and through the successful assault force to continue the advance. To the rear the fog persisted, causing confusion among units attempting to move up and great difficulties for those wounded seeking the dressing stations behind the line. The tanks became targets as the fog dispersed in front, but the progress continued and great columns of prisoners started their journeys to the cages. By the time, early in the afternoon, that the commanders could see clearly they were rewarded with the most heartening sight of this long war – a genuine breakthrough.
The 46th Division took 4,200 prisoners that day, 80 per cent of the total to fall into Allied hands on this front. They had done this at the cost of fewer than 800 casualties. But most remarkable of all, against the strongest defensive system the Germans had been able to construct, they had advanced nearly 3.5 miles (5.5 kilometres).
In the days following the momentum was maintained. The 49th Division and the Australian 2nd Division took Ramicourt and Montbréhain, to the right of the Le Cateau road, to complete the conquest of the Siegfried Position and by 5 October the entire Hindenburg Line had been broken. Ahead lay green fields and unblemished countryside, and an enemy now doomed to defeat.
